How to Create an Event in LinGift: Step-by-Step Guide
Learn how to create your first event in LinGift, add preferences and gift ideas, publish it, and share everything with your guests through a simple link or QR code.

LinGift Team
Editorial team
Creating an event in LinGift is simple and only takes a few minutes.
The goal is to bring together the important information about your celebration, gift preferences and specific gift ideas in one place so your guests have better guidance when choosing what to bring.
LinGift can be used for birthdays, baby showers and other special celebrations where sharing preferences and gift ideas can make things easier for everyone.
In this guide, we'll walk through the complete process:
Create an account → create your event → add preferences → add gift ideas → publish → share
By the end, you'll have a unique link for your celebration and a QR code that you can share with your guests.
1. Create your LinGift account
The first step is creating an account.
Registration is required because every event is connected to the user who creates it.
This helps ensure that the event can only be managed and modified through the corresponding account.
The process is quick.
Go to the LinGift registration page:
Complete the short form with:
- Your email address.
- A secure password.
You'll use these same details later to sign in to LinGift.
After submitting the form, you'll receive a confirmation email.
Open the message and select the link to activate your account.
If you don't see the email after a few minutes, check your Spam, Junk or Promotions folder as well.
Once your account is confirmed, you can sign in and create your first event.
2. Create your first event
After signing in, you'll find My Events in the main navigation.
From there, you can see the events you've already created or start a new one.
When creating an event, LinGift will ask for a few basic details about the celebration.
Event title
Use a short and easy-to-understand name.
For example:
Sofia Turns 10!
Dana's Baby Shower
Lucas' Celebration
The title will be one of the first things your guests see.
Description
This section gives you more room to explain the celebration.
It doesn't need to be long.
The goal is to communicate the excitement and personality behind the event.
For example:
We're excited to celebrate Sofia's special day with family and friends. It will be an afternoon to spend time together, have fun and create great memories.
This message will be visible to your guests when they open the event, so it's a good opportunity to make it feel personal.
Event date
Finally, select the date of the celebration.
Once this information is complete, you're ready to create the event.
3. Manage your event
Once the event has been created, LinGift will take you to the event management area.
From here, you can update the general information whenever necessary.
You'll also have access to two particularly important sections:
Gift Preferences
and
Gift Ideas
They serve different purposes, but they work especially well together.
Preferences help guests understand what kinds of gifts may be a good fit.
Gift ideas provide more specific examples.
Together, they help answer one of the most common questions before a celebration:
“What should I give?”
4. Add gift preferences
Let's start with Gift Preferences.
This section allows you to share general information that can help guests make better choices, even if they decide not to choose one of the specific gift ideas you added.
You can include details such as:
- Clothing sizes.
- Favorite colors.
- Interests.
- Hobbies.
- Favorite styles or themes.
- Types of books.
- Preferred brands.
- Other useful details.
If you don't see a category that fits the information you want to add, you can choose Other and create an additional preference.
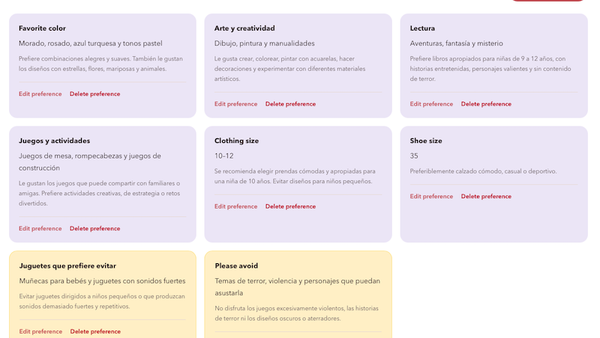
For example, for a 10-year-old's celebration you could add:
Favorite colors: purple, pink and turquoise.
Interests: drawing, crafts and reading.
Clothing size: 10–12.
Books: adventure, fantasy and mystery stories.
The goal is not to restrict your guests' choices.
It's to give them more context.
5. Don't forget what guests should avoid
One especially useful preference option is Avoid.
This allows you to tell guests which types of gifts probably would not be a good fit.
For example:
Avoid: very loud toys.
Avoid: large stuffed animals.
Avoid: clothing styles the person doesn't normally wear.
Avoid: specific products or items that aren't suitable.
This kind of information can be just as useful as explaining what someone likes.
Imagine a child loves animals, but already has many large stuffed animals and very little space left to store them.
A guest might assume another stuffed animal would be a perfect choice.
Adding an Avoid preference can help prevent that kind of mismatch.
The goal isn't to create a long list of restrictions.
Only include details that genuinely help guests make a better decision.
6. Add specific gift ideas
The Gift Ideas section is more specific.
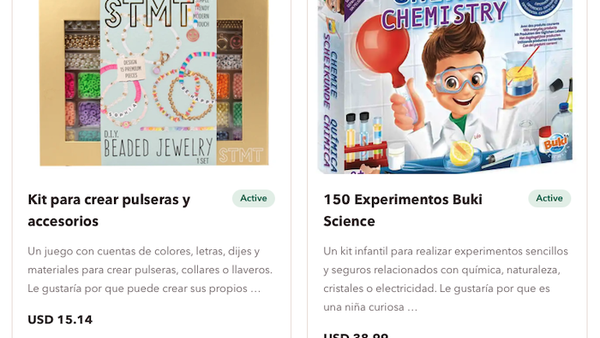
Here, you can add a particular product or gift idea and include information such as:
- Name.
- Description.
- Product URL.
- Estimated price.
- Image.
- Display order.
For example:
Friendship bracelet kit
Description:
A creative kit for making different bracelet designs. Sofia enjoys crafts and loves creating things herself.
Estimated price:
$20–$25.
Link:
You can add a product URL so guests can see an example or find more information.
Gift ideas complement the preferences you added earlier.
The difference can be summarized like this:
Preference:
Sofia loves arts and crafts.
Gift idea:
Friendship bracelet kit.
The first provides context.
The second provides a specific suggestion.
Using both gives your guests the option to choose the exact idea or find something else inspired by the person's preferences.
7. Organize your gift ideas
When you add multiple gift ideas, you can also choose the order in which you want them to appear.
This makes it easier to keep the list organized.
For example, you might arrange them by:
- Smaller or simpler ideas first.
- Gifts connected to the person's strongest interests.
- Different budget ranges.
- Experiences.
- Higher-value ideas.
You don't need to add a huge number of products.
A smaller selection of thoughtful ideas combined with useful preferences is often much more helpful than a long list without context.
8. Gift reservations help prevent duplicates
Another useful LinGift feature is the ability for guests to reserve a gift idea.
When a guest finds something they would like to give, they can reserve that option.
This helps reduce a very common celebration problem:
two or more guests choosing the same gift.
Reservations give other guests a signal that an idea has already been selected so they can consider something else.
This makes coordination easier while still leaving everyone free to choose.
9. Review your event before publishing
Before sharing the event, take a moment to review everything.
Check that:
- The title is correct.
- The date is accurate.
- The description is complete.
- Preferences are up to date.
- Sizes are correct.
- Gift ideas have clear images and descriptions when needed.
- Product links are working.
- There are options that can work for different budgets.
- Anything guests should avoid is clearly explained.
It's also a good idea to preview the event from a mobile device since many guests will probably open the link from WhatsApp, text messages or another mobile app.
10. Publish your event
Now comes one of the most important steps.
At the top of the event management area, you'll find the:
Publish Event
button.
Once selected, LinGift will prepare the event so it can be shared with your guests.
The system will generate:
A unique event link
and
A QR code image connected to that link.
Your celebration is now ready to share.
11. Share the link or QR code with your guests
You can share your LinGift event link through:
- WhatsApp.
- Text message.
- Email.
- Private social media.
- Digital invitations.
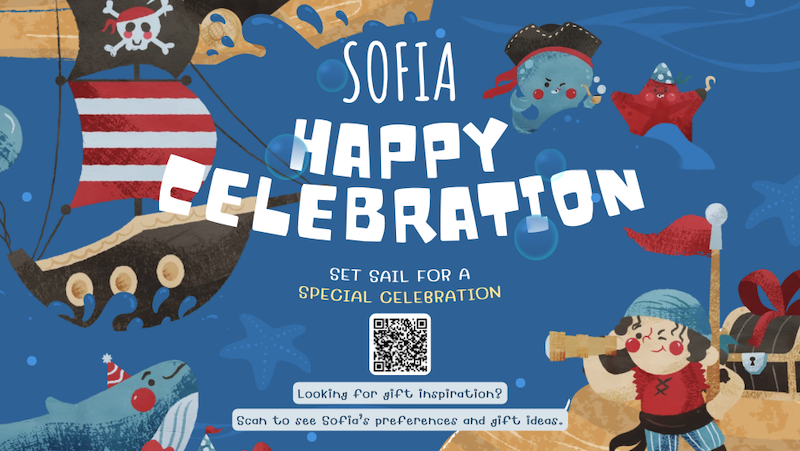
You can also use the QR code image generated by LinGift and include it directly in your invitation design.
For example, you could add this message next to the QR code:
Looking for gift inspiration?
Scan to see Sofia's preferences and gift ideas.
Or, if you want an even softer approach:
Want to know Sofia a little better?
Scan to discover her preferences and gift ideas.
This makes the purpose of the QR code immediately clear without making gifts feel mandatory.
Suggested image: Use the celebration invitation with the LinGift QR code here. This is an excellent real-world example of how the generated QR code can be incorporated into an invitation.
Guests can then open the event and find everything in one place:
- Celebration information.
- Preferences.
- Useful details.
- Things to avoid.
- Specific gift ideas.
- Reservation options.
There's no need to send product screenshots, sizes, links and preferences across multiple conversations.
Everything stays organized in one place.
The complete LinGift event creation process
Creating an event can be summarized in a few steps:
- Create an account
- Create your event
- Add preferences
- Add things to avoid
- Add gift ideas
- Review the information
- Publish
- Share the link or QR code
Once that's done, your guests will have much more information to help them choose.
Tips for creating a more useful event
You don't need to fill every available field simply because it's there.
The information should help your guests.
Keep these ideas in mind.
Keep the information current
People's interests change.
Don't rely on preferences from several years ago if they're no longer relevant.
Offer variety
Avoid including only expensive gifts.
Different guests will have different budgets.
Explain interests
“Alex enjoys building things” can sometimes be more useful than providing only a link to a particular toy.
Avoid unnecessary private information
Only include the information guests need to understand the celebration and make better gift choices.
Check your links
If you add external product URLs, make sure they still work before sharing your event.
Keep the list manageable
You don't need 50 gift ideas.
A small collection of strong suggestions combined with useful preferences can work much better.
Frequently Asked Questions
Do I need a LinGift account to create an event?
Yes. Events are connected to the account that creates them so their management remains under the user's control.
Do guests need an account to view my event?
If this matches the current LinGift behavior, I would use:
No. Guests can view the event using the shared link without creating an account.
Can I edit an event after creating it?
Yes. You can return to the event management area and update its details, preferences and gift ideas whenever necessary.
Do I have to add specific gift ideas?
No. Preferences alone can provide useful guidance. However, specific ideas can help guests who prefer more concrete suggestions.
Can I tell guests what not to give?
Yes. The Avoid preference allows you to share information about items or types of gifts that would not be a good fit.
How can I prevent duplicate gifts?
Gift ideas can be reserved so guests can coordinate their choices and reduce the chance of duplicate gifts.
How do I share my event?
Once the event is published, LinGift generates a unique link and QR code that you can share digitally or include in your invitation.
Create your first event in LinGift
A celebration should create excitement, not uncertainty about what to give.
LinGift helps you bring together the information your guests need to better understand the preferences and interests of the person you're celebrating.
No guessing.
No scattered information across multiple messages.
And a simple way to help reduce duplicate gifts.
Create your first event, add the preferences and ideas that matter, and share everything with your guests through one simple link.